Hello beautiful people! How’s it going?
So, today I’m gonna go a little more technical on you, but as always, the tips I’m gonna give you are priceless!
Answer me this: What’s a good photo worth to you? Do you think a great edition can change a photo’s quality?
A good picture is a matter of point of view!
If we’d wanted to define if a photograph is good or not, technically speaking, we’d say a photo is good if it checks the following requirements:
- There’s no noise;
- The image is well focused;
- There’s good lighting;
- The framework is within the rule of thirds.
However, even if the photo checks all the technical requirements, that doesn’t necessarily mean it is a good photograph aesthetically speaking.
So, aesthetically speaking, if the image corresponds to what the photographer had in mind before the click, if it represents the photographer’s style and personality, it must be a good photo.
There’s always something to improve 😉
Even if the photo is faithful to your style and it captures everything you imagined, there are some external factors that can lead you to disappointment. It could be a shadow you failed to see before taking the photo, the bad lighting in the room, or something like that…
Thankfully, most of these problems can be solved by editing the picture. And this task is easier to do when you have an app as complete as AirBrush!
So, thinking about all this, I have some examples I’d like to show you. Regardless of whether the photo is both technically and aesthetically good, we can always add more life and beauty to it. Stay with me!
Time for a Tutorial!
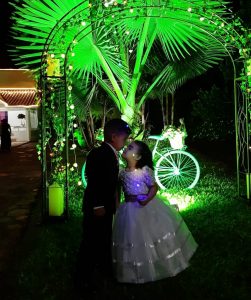
The chosen photo is from a very special moment: the first time Ceci was the flower girl in a wedding! The place was really charming and beautiful. However, when I took the photo, the lighting of the place didn’t help, it draw all the attention to the scenery and Ceci and her friend didn’t really stand out. So, with AirBrush’s help, I was able to balance the picture and leave both things in evidence: Ceci and her little friend, without taking the charm out of the scenery…
Editing the photo. Step by step:
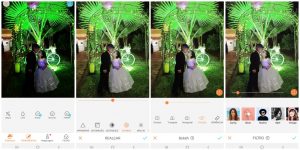
1º Step: I Chose the photo and opened it on AirBrush;
2º Step: I went to “Tools” and clicked on “Enhance”
Contrast: – 55
Shadows: +44
Brightness: +26
Highlighter: +85
Temperature: +26
3º Step: Still on the “Tools” section, I clicked on “Bokeh”, and select the intensity of the effect in 6, with the Heart shape, just to get the sharpness out of the picture a bit.
4º Step: When choosing the “Filters”, I went for the “Sweet” one, which can be found in the “Blush” folder, and I selected the intensity in the +10 level.
Final Result
Look at the difference!
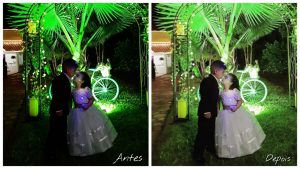
Before and After.
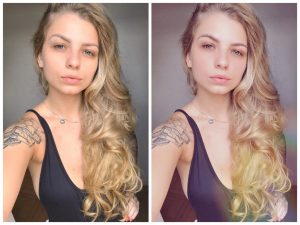
I have some other examples of how editing your pictures makes all the difference in the world.


So, tell me, what did you think about it?
If you liked it, go to your AirBrush app, edit a picture, post it on Instagram, and tag us @airbrush_br
Kisses, and until the next post! :*
- 10 Tips to Achieve the Perfect Picture with AirBrush - 03/11/2023
- It’s Scorpio Season! - 02/11/2023
- Brush it out! - 31/01/2020


- 10 Tips to Achieve the Perfect Picture with AirBrush - 03/11/2023
- It’s Scorpio Season! - 02/11/2023
- Brush it out! - 31/01/2020