Your day started out great, you went out, took some pictures and waited super excited to post them. You came home, and the moment you’ve been waiting for is finally here: time to edit your photos. But then, as life isn’t fair, you realize all your photos have a terrible lighting, they look dark and lifeless. What’s there to do?! Well, you can stay calm because AirBrush always has your back!
Today I’m gonna do a little tutorial on how to use this amaaazing tool to light up your face. I’m positive you’re gonna like it as much as I do.
Relight.
The incredible tool I was just talking about is called “Relight”, and it’s gonna blow your mind. Like most of AirBrush’s features do. This tool improves the lighting in your photo, giving back the life to your photo you thought was lost.
Learning how to use it.
Using “Relight” to edit your photo is pretty simple. First step is to open your AirBrush app (duh!), then choose the photo you’d wish to improve, and go to “Tools”.

Applying Relight.
Once you’re in the “Tools” section, click on “Relight”. You can choose the intensity you like. I always use it in the maximum, because this way the picture gets brighter, but it’s completely up to you.

The final touch.
After that, I decided to use a filter to make it stand out. Went to “Tools” and choose the “Rosegold” from the “Vintage” folder.

Before and After.
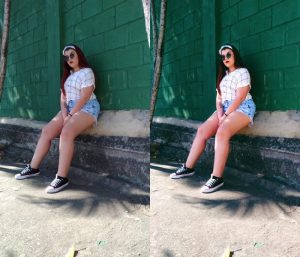
This is the final edit, it ended up being super cute, and very different from the original. Full of life and color.
How to obtain this feature?
“Relight” is one of the AirBrush Black tools, which requires you to subscribe, but like I always tell you, to have beautiful photos we need to invest a little. And the good thing is you can test it out first, by using the free trial. I’m sure if you test it, you are not gonna regret it!
Don’t forget to tag us on Instagram @airbrush_br.
Kisses, and until the next one.
- 10 Tips to Achieve the Perfect Picture with AirBrush - 03/11/2023
- It’s Scorpio Season! - 02/11/2023
- Brush it out! - 31/01/2020


- 10 Tips to Achieve the Perfect Picture with AirBrush - 03/11/2023
- It’s Scorpio Season! - 02/11/2023
- Brush it out! - 31/01/2020